
Setting up your Consult Settings
Note: This feature is available for Patient Engagement (Tier 2) telerehab scheduling and Practice Management (Tier 3) members only, with certain settings restricted to Practice Management and clinic accounts. For more information on plans, visit our pricing page.
Why Consult Settings matter
Every clinic runs cancellation and reminder policies a little differently, and your booking system should bend to match yours, not the other way around.
Consult Settings in Embodia let you set the rules once and apply them across every service, so you can trust things are running exactly in accordance with your policies while you focus your time on patients.
Use Consult Settings to decide:
- Whether patients can cancel or reschedule their own appointments (by default, patients cannot cancel or reschedule consults themselves)
- Who else you’d like notified if patients do cancel or reschedule
- How far in advance consult notifications go out, and how many are sent
- Whether patients need to add payment details before their appointment.
Set them once under your clinic account (or your personal account, if you're not the clinic manager), then attach them to any service or consult in a couple of clicks. Get this right early, and your practice can run like a well oiled machine.
Creating Consult Settings
If you're the clinic manager, you'll get a choice between creating the setting for the clinic account or for your personal account.
We recommend choosing the For the clinic account option whenever you can: it gives every practitioner in the clinic access to the same setting and is the more flexible route long-term. Particularly if you’re a solo practitioner, you’ll save yourself from having to redo any setup if your clinic grows.
If you're not the clinic manager, your setting is automatically scoped to your personal account and private to you.
When creating a new Consult Setting isn’t necessary
All new Embodia accounts include a default consult setting that will automatically be attached to all services.
This means, if all of your services require the exact same settings, you may not need to create a new setting at all. You can simply edit the default setting (including the name, if you wish) and all of your changes will apply to all of your services.
You can learn more about all of the options within Consult Settings, as well as how to edit existing ones, in the sections below.
When a Consult Setting needs to be created
You’ll want to create a new consult setting if some of your services follow different policies (ex. Assessments vs Treatments).
You can create as many consult settings as you need and name them whatever makes sense for your practice. Consult Setting names are internal only.
To create a new consult setting, navigate to Consults > Settings > Consult settings and then click on Add a setting:

You’ll be brought to a page where you can modify each setting in accordance with your policies and preferences.
A detailed look at Consult Settings
Setting patient cancellation rules
Choose if and when the patient can cancel the appointment by selecting one of the following from the Patient cancellation drop-down:
- Patients cannot cancel the consult themselves;
- Patients can cancel the consult right up to the start time of the consult;
- Patients can cancel the consult up to a certain period before the start of the consult. If you select this option, the day/time that the patient has to cancel until will be displayed on their Embodia account. If this option is selected, Embodia displays the cutoff time on the patient's account so they know exactly where they stand. Once the cancellation deadline has passed, the button will no longer show in their portal. Here's an example of what that looks like:

If you allow patients to cancel their consult, specify if you would like the patient to provide a cancellation reason.
Setting patient rescheduling rules
Note: This option is only available for consult settings created under the "For the clinic account" option, and for clinics subscribed to the Practice Management (Tier 3) plan.
Patient rescheduling works the same way, as cancellation settings. You decide if and when your patients can reschedule their consults. Select one of the following from the Patient rescheduling drop-down:
- Patients cannot reschedule the consult themselves;
- Patients can reschedule the consult right up to the start time of the consult;
- Patients can reschedule the consult up to a certain period before the start of the consult.
Notifying your team of changes
Set who else, beyond the treating practitioner, should hear about a cancellation or reschedule. Like patient rescheduling, this option is limited to Consult Settings created under the “For the clinic account”, for clinics on a Tier 3 membership.
Email Notifications
By default, Embodia sends a patient two email reminders, 2 and 24 hours, before their appointment. You can dial that back, add a custom notification time, or turn email reminders off entirely.
Choose from the following options to turn off:
- Do not send an email when the consult is booked, modified, or cancelled;
- Do not send email reminders 24 hours before the consult to the patient;
- Do not send email reminders 2 hours before the consult to the patient.
Practice Management (Tier 3) members can also optionally specify a custom amount of time before the consult to send email reminders. Just enter the number of hours, greater than 24h.
SMS Notifications
Note: This requires a connected Twilio account for clinics with a Tier 3 membership. Learn more in our Enabling and setting up SMS appointment reminders guide.
If you have successfully connected your Twilio account, and your patient has a mobile number on file, Embodia will send a patient two SMS reminders, 2 and 24 hours, before their appointment.
To change that, you can check either of the following boxes:
- Do not send SMS reminders 24 hours before the consult to the patient;
- Do not send SMS reminders 2 hours before the consult to the patient.
Like email reminders, Practice Management members have the option to specify a custom amount of time before the consult to send SMS reminders as well. Just enter the number of hours, greater than 24h.
Requesting payment information at booking
If a patient doesn’t have a card on file, you can send a payment information request form as soon as the consult is scheduled to allow the patient to securely add their payment information.
To do so, at the bottom of your Consult Settings select the Form and the Payment method (both are needed).
This option will only be available for consult settings created under the "For the clinic account" option, for clinics subscribed to Tier 3 memberships. You can also learn more about payment information request forms in the Sending a payment information request section of this guide.

Note: In order for the payment information to be collected, the Payment method selected must be connected to Stripe. Learn more about connecting payment methods to Stripe in the Setting up your payment methods guide.
Editing existing Consult Settings
Whether you’re editing the Default Embodia consult setting or any others you’ve created, the process is the same.
To edit an existing Consult Setting, navigate to Consults > Settings > Consult settings and then click on the hyperlinked name of the setting you would like to edit or view.
This opens a page that looks like this:
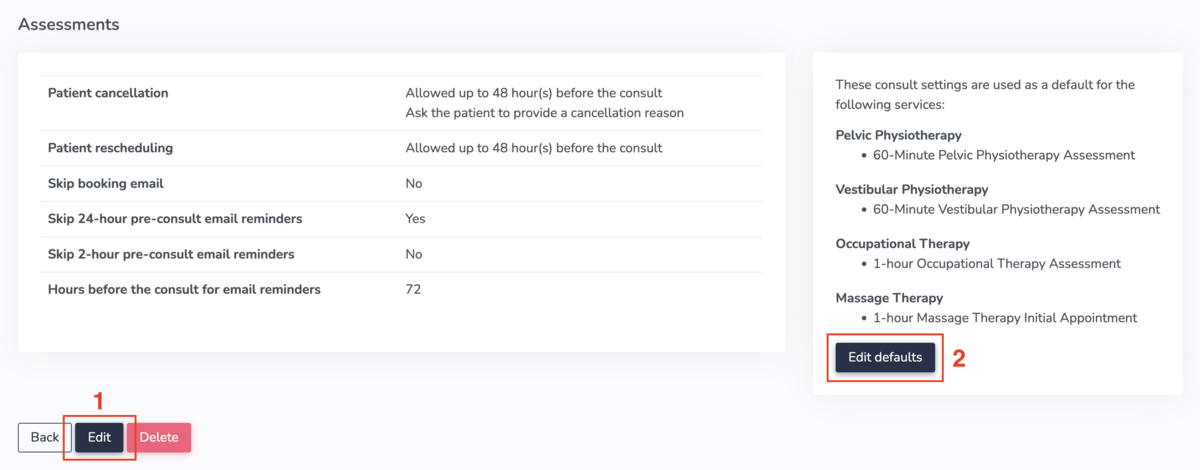
From here, you have a couple of options:
You can click Edit to modify your Consult Settings, summarized on the left, or
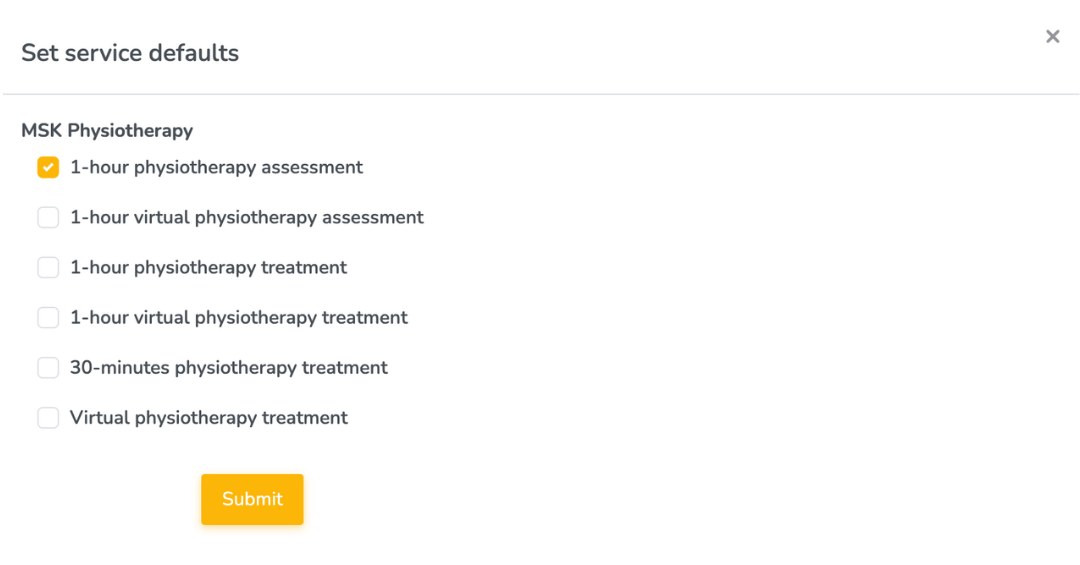
Click Edit defaults to select which services you would like to these Consult Settings to apply to, by default
Option 2 will pull up a window for you to make your service selections and click Submit (see below).
Changing Consult Settings for services or consults
Changing Consult Settings for your services
As we saw in the previous section, it’s possible to assign services to a Consult Setting from within a Consult Setting. There is another way to connect the two as well.
Once you’ve created your Consult Settings (if applicable), you can assign a Consult Setting to a service when editing a service from your Our services settings.
To get to Our services navigate to Settings > Scheduling settings > Our services.
There, you can choose a service, click on the edit icon, and choose your desired Consult Setting from the dropdown. You can learn more about editing your services in the Setting up your services guide.

Changing the Consult Setting when booking a consult
When booking a consult, Embodia will autofill the service settings based on the service selected. This includes Consult Settings.
As efficient as that is, there may be situations where you need to make exceptions. That’s why you can still choose to select a different Consult Setting at the time of booking, should you need to.
To do this, when booking a consult, select your desired Consult Setting from the Setting dropdown in the scheduling pop-up form.
